Monday, May 16, 2011

"Boob lights"

Is it PC to call these boob lights? That seems to be what everyone calls the budget-basement contractor favorite light fixtures that are in every non-updated house I've ever seen. They're everywhere, the boob lights! Our house has five of them, and they were hard to ignore in their polished brass, 80's glory.
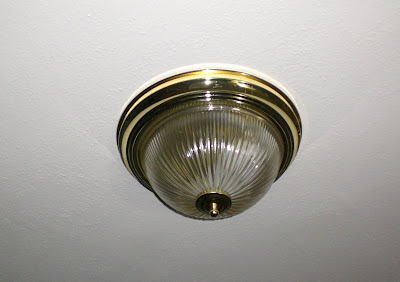

But I didn't have the budget or the knowledge to replace all five of them, so I thought I would try the Krylon metallic finishes spray paint. Let me tell you, the process was not without challenges. first I tried to completely remove the fixtures from the ceiling so I could take them outside to spray and avoid the fumes. That resulted in me realizing that there was no way I trust myself to turn off the power, unhook the wiring, and put it all back together in working fashion. But then reaffixing the fixtures to the ceiling proved to be quite complicated and required Jeremy's help (he was thrilled!).

So I painted the living room and bedroom fixtures with Oil-Rubbed Bronze spray paint, and did the kitchen and bathroom in Brushed Nickel, to match the existing fixtures. The ceiling around this ORB light needs some touch-up, but I like the way it looks!


Monday, May 9, 2011

Kid Rock

For my next "crafty" post, I want to show off the child's rocking chair makeover I just finished. I bought this mini antique rocker at a garage sale for $3. The woman I bought it from said it had been in her family since her Grandmother, and her grandchildren had used it, so she estimated 5 generations. It must be well-built, because it was well-worn but sturdy. Here is the before picture. The canvas fabric was pretty gross.

To refinish the chair, I sanded it, primed it (twice), and spray painted it white (twice). I added foam and batting to the seat, and covered it in fabric. A note about my fabric choice - I originally (painstakingly) chose a gorgeous Amy Butler fabric from Fabric.com, which came and was beautiful, but was definitely not home decor fabric (oops), so it wasn't quite heavy enough for this project. So I just ran to Joann's because I was sick of being patient, and picked out a fabric that would work. Gender neutral, bright, and coordinates with white. I think this fabric is ok, but certainly wasn't my first choice. In case you're curious, this was my first choice.

If you look at the "before," I didn't think the back looked very comfortable, so I wrapped and weaved some jute webbing and put quilt batting over that. However, since I didn't really have a frame to staple fabric onto on the back, I settled for making a slipcover. Here it is, with three buttons. This is handy if the back ever gets dirty, but I can honestly see the seat getting dirty much before the back ever would.

To round things out, here are some photos shot by the "momperazzi" of the chair being used.
Reading
Food on the face
Ready to get down
Getting down (so cute)
Back up
Rocking chair = Jungle gym

Friday, May 6, 2011

She's craftay

Or, at least trying to be! Since I DO realize that it has been over a month since I've posted on the blog, I thought I'd do a little series of posts about the crafts/home updates I've been working on. Some are more exciting than others. I thought I'd post this little Easter project first, since it will quickly become outdated.

This is an Easter egg garland that I made out of paint chips from Walmart. It cost $0 because I already had kitchen twine. I still haven't taken it down, because it's Springy and cheery and colorful (which the weather is not!).

Tuesday, March 29, 2011

One


Happy First Birthday to Isaac Raymond Wang! He turned 1 yesterday and we had a little party for him. It was so much fun and he was such a good sport, despite being tired, sick, and cranky. So many people came and loved on my little man. He (we) are so blessed. Here are some pictures.

Sunday, March 20, 2011

A project

I read a lot of design and crafting blogs. This leads to obsessions over things like reupholstering an old chair, which I wouldn't necessarily call healthy. Anyway, after reading about a lot of before/after chair projects on Design Sponge, I was inspired to find an old chair and reupholster it. Since I hadn't done this before, I went in search of an "easy" side chair for my living room, to replace my husband's (broken) college futon, which we rarely sit on.

I found my chair at the Salvation Army in Moscow for $16. It had black legs and navy velour fabric. It had been recovered once, and really not well. Here is the before. As you can see, the back was falling off. Sorry for the low-quality pictures, our camera battery died, and we have a new one on order. These are phone pics.
Underneath the velour I found a layer of 60's upholstry fabric, probably the original, cream and faded red. Note all the staples on the ground!
Under the red fabric was the original padding, which was in fairly good shape, so I decided to re-use it, and just add some fresh foam and batting to provide additional padding. I also added foam and batting to the back. Sorry, I didn't take photos after I added padding.
I learned a lot in this process! Primarily, I learned that I really enjoy reupholstering chairs. This is good news, because I have a lot of leftover materials (foam, batting, tack tape, staples, etc.). So if I find another chair with good bones, I can do another one, and maybe sell it?

Here is the after. I painted the legs white, found the fabric on sale at Joann's, and tufted fabric-covered buttons, and everything! I even did a "real" upholstry job on the bottom (no pic) and the back. I'm very pleased with the outcome, and Jeremy says it passes the living-room test.

Saturday, February 26, 2011

Mr. Personality

An afternoon on the couch at home. Don't mind the Christmas pajamas!

Wednesday, February 2, 2011

A boy and his truck

After weeks (months?) of watching the baby play with momma's makeup, hair brushes, and combs, which happen to be in a highly accessible baby-height drawer, Isaac's dad will be very happy to see him doing something manly - being totally engrossed in his toy truck. :)